Publishing the Website on the Internet
If you have rented a name (domain) and web space to publish your site on the internet, it is time to upload your files to your folder on the server.
Note: Basic concepts such as domain and hosting were explained in our first topic.
In order for visitors to see our website when they type our address into the browser, all files belonging to our site must be uploaded to our folder on the server. In order to upload the files, we will need the ftp address, ftp username and password information. This information was sent to us by e-mail as soon as we rented the web space or we can learn these informations at the plesk panel of the site.
Of course, we also need a program that will perform the installation process, among which the program called FileZilla stands out because it is both free and easy to use.
When we run the FileZilla program, a screen similar to this will appear:
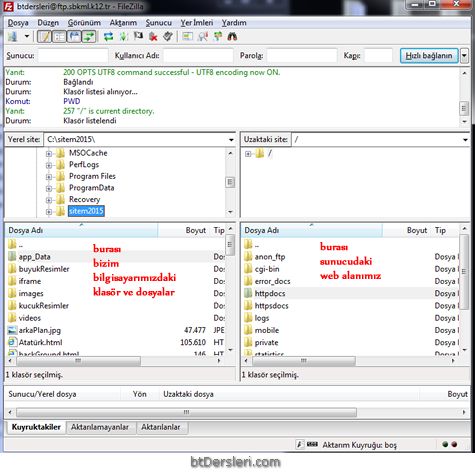
We must enter the ftp address given to us in the Server section at the top. eg;
ftp.btdersleri.com
ftp.myschool.k12.tr
etc..
We must fill in the Username and Password fields as in the incoming mail. We can leave the Port part blank. Then, when we click on the Quick Connect button, our web space on our server will be connected.
After the connection is established, the folders in our web area will be listed in the middle-right part of the screen. One of them is the folder where we will upload our files, and we need to open that folder by double-clicking, then upload our files. Although the name of our home folder may vary depending on the server, it is usually one of the following names:
Httpdocs, wwwroot, www, htdocs …
To upload files or folder on our computer, we need to find them from the left side and right-click and give the upload command. It is also sufficient to double-click a single file to upload it.
Similar steps should be followed to download files from the server to our computer. The file should be found on the right side of the screen and right click-Download command should be given.
While uploading our files, we must pay attention that the folder structure on our local computer is the same on the server.
For example, all the files of our website are in a folder named mysite2015. As can be seen in the picture, once this folder on our computer is clicked on from the left side, all files and subfolders in that folder are listed in the subsection.
If we select everything in the Sitem2015 folder and upload it to the main folder on the server, there will be no problem.
Some common mistakes are:
-
If we upload the folder itself, not the contents of the sitem2015 folder, since the sitem2015 folder will be created in our home folder on the server, visitors will have to type the full full address such as http://www.siteadi.com /sitem2015/fileName.html to access our pages. This is undesirable.
-
Even if we upload the files to a wrong folder, not the main folder on the server, visitors will not be able to see our site.
One of the pages on our site is our home page and the name of this page must be index or default. When visitors type the address of our site in the browser, the page named index or default is automatically displayed.
publishing the website, uploading the website to the server, how to publish the website, publishing the website on the internet, using ftp, using filezilla
EXERCISES
There are no examples related to this subject.
Read 1686 times.